Silhouette Studio Christmas Recipe Cards

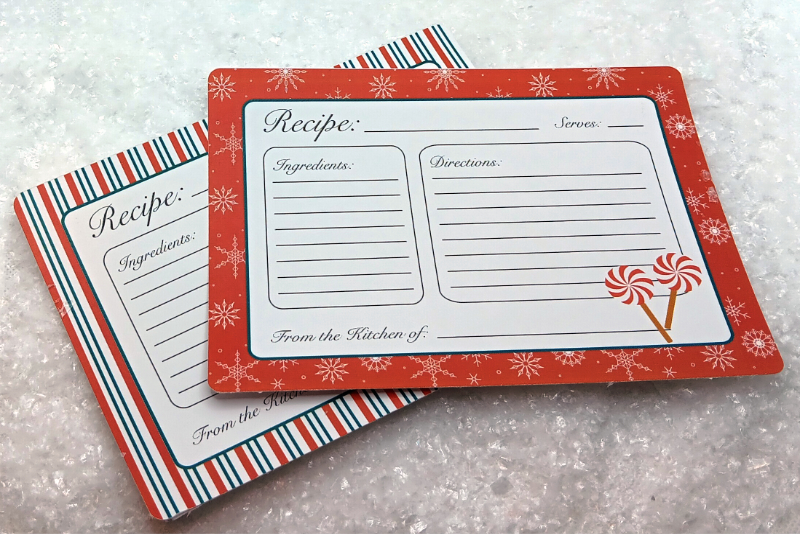
We will continue to work on the recipes cards in Silhouette Studio®. Now we will add the boxes for the Ingredients and Directions sections.
At this point, the only object in the design that has a red cut border is the large rectangle. This is what we need to cut the card. All the other objects in the design have black, green or white stroke/borders, which will not be used as cut lines.
Back
How to Draw a Holiday Theme Collection of Elements
The Silhouette Cameo 5 was supplied to me by Silhouette America®.
Silhouette, Silhouette Studio, Silhouette Connect, PixScan, Silhouette CAMEO and Silhouette Portrait are either registered trademarks or trademarks of Silhouette America, Inc. Product screen shot(s) reprinted with permission from Silhouette America, Inc.
- With the Rounded Rectangle tool, draw a square that is 2 inches wide by 2.75 inches tall and at the left of the card.
- Repeat the previous step but draw a rectangle that is 3 inches wide and 2.75 inches tall and at the right of the card.
- Set the Stroke color to black for both boxes. Set the Stroke Size to 1 pt (see screenshot).
- In the small box, add the text Ingredients:. In the larger box, add the text Directions: (see screenshot).
- Starting below the text, draw lines within both boxes. Set the Stroke color to black and the Stroke size to 1 pt (see screenshot).
- Click the LIBRARY tab at the top of the workspace.
- Drag your pattern file from your computer to the Library.
- Go back to the DESIGN section and select the largest rectangle.
- Open the FILL panel and click the Fill Pattern tab. Select your pattern (see screenshot).
- Select the white rectangle. From the Quick Assess Toolbar, set the Stroke color to green or the color of your choice. Set the Stroke Size to 3 pts.
- From the top menu, click File - Merge. Select your graphic and click OK.
- Drag the graphic to the bottom corner and resize to fit.
- With the graphic still selected, go to the Quick Asses Toolbar and set the Stroke color for the graphic to white.
Now it's time to customize the design a bit further. We will add a pattern fill border and a small graphic at the bottom of the card.
You can use any of the patterns already in the Patterns section. However, if you wish to add your own, it's easy. We just drag the file from your computer to the Patterns section in the Library.
Once the file is in the Patterns section of the Library, you can add the pattern fill to the card.
Now we will add a colored stroke to the white rectangle (see screenshot).
Now we will add the small graphic to the bottom corner (see screenshot).
At this point, the only object in the design that has a red cut border is the large rectangle. This is what we need to cut the card. All the other objects in the design have black, green or white stroke/borders, which will not be used as cut lines.
- Open the PAGE SETUP panel. Set the Machine to Cameo, the Feed Type to Auto, Cutting Mat to Cameo and Media Size to Letter.
- Click the Registration Marks icon and check the On circle.
- Select the card and click File - print. Send the card to your printer.
- Place your printed card on a cutting mat and load it into your Cameo.
- Select the SEND tab to open that panel (see screenshot).
- Click the Line tab and you will see that we have several line colors.
- Uncheck the boxes for the other line colors.
- For the red line color set the Action to Cut.
- Feed the printed card into your Cameo and click SEND.
The printer will print both the card and the registration marks that the Cameo® will use when cutting out your card.
We only want to cut the red line.
Back
How to Draw a Holiday Theme Collection of Elements
The Silhouette Cameo 5 was supplied to me by Silhouette America®.
Silhouette, Silhouette Studio, Silhouette Connect, PixScan, Silhouette CAMEO and Silhouette Portrait are either registered trademarks or trademarks of Silhouette America, Inc. Product screen shot(s) reprinted with permission from Silhouette America, Inc.

Related Articles
Editor's Picks Articles
Top Ten Articles
Previous Features
Site Map
Content copyright © 2023 by Diane Cipollo. All rights reserved.
This content was written by Diane Cipollo. If you wish to use this content in any manner, you need written permission. Contact Diane Cipollo for details.


